
Old microwave ovens have a way of catching a welder’s attention once they stop working. Inside that metal box sits a surprisingly powerful transformer, and for many DIY fabricators, the idea of turning it into a homemade welding machine sounds both practical and challenging.
That curiosity is exactly why people search for How to Make Arc Welder with Microwave Transformer before starting a low-budget workshop project.
But working with microwave transformers is not something to take lightly. High voltage components, extreme heat, and improper wiring can create serious safety risks if the setup is rushed or poorly understood.
I’ve seen homemade electrical projects fail not because the idea was bad, but because critical safety precautions were ignored along the way.
That’s why understanding the basics matters before touching a single wire. In this guide, I’ll break down the key concepts behind using a microwave transformer for welding, the common mistakes beginners make, and the important safety considerations that should always come first when experimenting with DIY welding equipment.
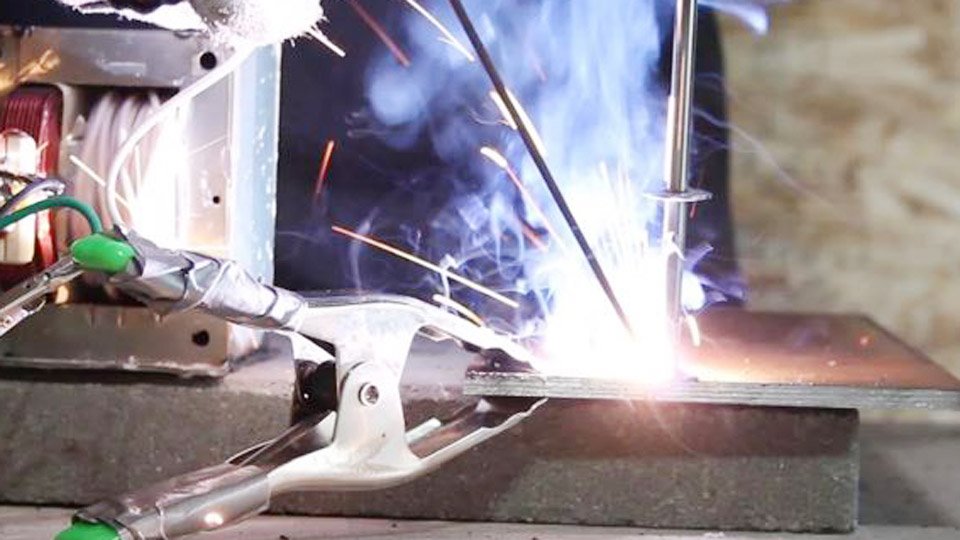
Image by mods-n-hacks.gadgethacks
Why Build a Microwave Transformer Arc Welder?
Commercial buzz-box welders start around a few hundred bucks, and decent ones with good duty cycles cost more. Scavenging a couple of dead microwaves can get you welding for under $50 in additional parts.
The output is AC, which works fine with many electrodes, and you can achieve 50–150+ amps depending on your winding and number of transformers.
In real shop situations, this matters when you’re fixing a trailer hitch, building a custom bracket, or doing quick repairs on farm equipment where buying a new machine isn’t practical. It gives decent penetration on thinner stock and handles 6013 or 6011 rods well for general mild steel work.
However, these welders lack the fine control, duty cycle, and safety features of store-bought units. They run hot, have no built-in current regulation beyond what you design in, and the open-circuit voltage is lower, making arc starts trickier for beginners. Understand the limitations before you start cutting metal.
Safety First: Non-Negotiable Realities
High voltage and high current kill. Microwave transformers were designed for short-duty cycles inside ovens, not continuous welding loads. The secondary side after rewinding puts out low voltage but potentially lethal amperage.
Always discharge the high-voltage capacitor in the donor microwave with an insulated screwdriver before touching anything. Wear full leather or flame-resistant gear, a proper welding helmet with correct shade (at least 10–11 for stick), gloves, and steel-toed boots. Work in a dry area with good ventilation—flux fumes aren’t kind to your lungs.
These setups often aren’t ground-fault protected like a real welder. A fault can energize the workpiece or frame. Many builders run them on dedicated circuits with breakers, but don’t assume household wiring will save you. If you’re not comfortable with 120V/240V wiring and basic electrical safety, stop here and buy a used welder instead.
Common beginner mistake: Thinking “it’s just AC like a cheap welder.” The MOT version can deliver a nastier shock because of how the circuit interacts with ground. Respect it like live 240V lines.
Understanding the Microwave Oven Transformer (MOT)
A standard MOT steps up household voltage to around 2000V for the magnetron while delivering high current. It has a heavy iron core, a primary winding (thick wire, fewer turns for 120V input), and a secondary (thousands of thin turns for high voltage).
For welding, we remove the high-voltage secondary and replace it with a few turns of heavy-gauge wire. This creates a step-down transformer: low voltage (around 20–40V open circuit) at very high current—perfect for sustaining an arc.
How it works in practice: The primary draws from the wall. The magnetic field induces current in your new heavy secondary. Two MOTs in series on the secondary side give you more voltage for easier arc starts while keeping amperage high. Power output depends on core size, wire gauge, turns, and input voltage.
Typical single MOT might give 20–30V and 50–100A potential. Stacking two or more scales it up, but heat management becomes critical.
Tools and Materials You’ll Need
- 2–4 old microwave ovens (larger capacity ones have beefier transformers)
- 10 AWG or heavier stranded copper wire (20–30 feet per transformer)
- Heavy-duty electrode holder and ground clamp
- Welding cables (at least 8–6 AWG)
- Multimeter for testing voltage and continuity
- Angle grinder or chisel/hammer for removing secondary windings
- Insulation materials (electrical tape, heat-shrink, varnish)
- Enclosure or cart for the finished unit
- Circuit breaker protection and heavy extension cord if needed
Source microwaves from curbs, thrift stores, or appliance repair shops. Avoid ones with obvious damage to the transformer core.
Step-by-Step: Building Your MOT Arc Welder
Disassembling the Microwaves
Unplug and discharge capacitors first—every time. Remove the outer case, magnetron, and wiring. Extract the transformer carefully; it’s heavy.
Removing the Original Secondary
Clamp the transformer securely. Use a chisel and hammer or cutoff wheel to cut out the thin secondary winding. Be extremely careful not to nick the primary winding. Damage here ruins the transformer. Knock out the shunts (magnetic pieces) if present to increase current capacity, though this affects regulation.
Clean the core thoroughly.
Winding the New Secondary
For each transformer, wind 15–25 turns of 8–10 AWG wire, depending on desired output. More turns = higher voltage, lower max current. Fewer turns = opposite. Aim for space-filling but not overcrowded. Insulate each layer well.
Count turns precisely and mark progress. Use insulated wire and secure ends to prevent shorts.
Assembling the Transformers
Wire primaries in parallel for 120V operation (or series for 240V if your shop has it). Connect secondaries in series, paying close attention to phasing—test with a multimeter so voltages add, not cancel.
Mount them on a sturdy, non-flammable base with good airflow. Many builders add a fan for cooling.
Wiring and Connections
Use beefy terminals or crimp connections rated for high amperage. Add an on/off switch and proper strain relief. Consider a variac or series resistors/ballast for basic current control, though many run without.
Test open-circuit voltage: Expect 20–40V AC. Short-circuit current testing should be brief to avoid damage.
Choosing and Using Welding Rods with Your MOT Welder
Your MOT welder is AC output, so stick to AC-compatible rods or those rated AC/DC.
Common Recommendations:
- 6013: Easy to use, forgiving, good for beginners and thin material. Runs smooth with less penetration.
- 6011: Deep penetration, works on dirty or rusty metal, more spatter.
- 7018: Low-hydrogen for stronger welds, but can be trickier on AC and requires good storage.
Electrode Diameters and Amperage Ranges (Approximate for MOT Setup):
- 1/16″ (1.6mm): 40–80A – thin sheet metal
- 3/32″ (2.4mm): 70–130A – general purpose, most versatile for homemade units
- 1/8″ (3.2mm): 100–180A+ – thicker stock, but pushes your welder hard
These are starting points. Your exact output depends on the build. Dial in by watching the arc: too cold and it sticks or sputters; too hot and you burn through or get excessive spatter.
Practical Welding Tips and Techniques
Joint preparation is king with limited-power machines. Clean metal thoroughly—grind rust, paint, and mill scale. Bevel thick joints for better penetration. Use short arcs and watch travel speed.
For thin material, lower effective power with a dimmer (inductive-rated) or pause between welds to let the transformer cool. On thicker stock, stack short beads and let cool to avoid distortion.
Common mistake: Running continuous long beads. MOTs overheat fast. Duty cycle is low—weld for 30–60 seconds, then cool for minutes.
Pros often add a choke or inductor for better arc stability. Beginners struggle with arc starts due to lower OCV; practice scraping or tapping technique.
Pros and Cons of MOT Welders
Pros:
- Extremely low cost
- High current potential for the price
- Simple design, educational
- Portable if built right
- Effective for mild steel repairs and light fab
Cons:
- Poor duty cycle—overheats quickly
- No fine amperage control without additions
- Safety risks higher than commercial units
- Heavy and bulky
- Limited to AC, less ideal for some electrodes or aluminum
- Can trip household breakers easily
Compared to a $300 inverter stick welder, the MOT version wins on raw material cost but loses on usability and longevity for daily work.
Material Compatibility and Real-World Applications
Best for mild steel. Stainless is possible but rods get hot fast due to resistance. Avoid aluminum—needs AC TIG or specialized processes beyond basic stick.
Great for: trailer repairs, gate fabrication, automotive brackets, farm equipment fixes, art projects. Not ideal for code work, pressure vessels, or critical structural welds.
Joint prep: 60–90° bevels on thicker plate, root gaps for penetration. Use backing bars on thin stuff to prevent burn-through.
Troubleshooting Common Issues
Overheating: Add forced air cooling, reduce duty cycle, check for shorted turns.
Weak Arc/No Arc: Wrong phasing, insufficient turns, poor connections, thin wire. Test voltages unloaded and under load.
Tripping Breakers: High inrush current. Use slower-start or dedicated circuit.
Sticking Rods: Increase voltage (more turns or transformers), clean work, correct amperage, better technique.
Inconsistent Welds: Voltage sag from long cords or undersized wiring.
Maintaining Your Homemade Welder
Inspect connections regularly for heat damage. Keep transformers clean and dry. Monitor temperatures during use—warm is okay, scorching hot means stop. Rewind or replace if insulation fails.
Many builders pot the transformers in oil or epoxy for better cooling and protection, but that’s advanced.
Reflection: What This Project Really Teaches You
Building and running a microwave transformer arc welder demystifies a lot about electricity, magnetism, and welding physics. You learn why amperage, voltage, and duty cycle matter in ways no textbook explains as well as hands-on experience.
You’re now equipped with practical knowledge of transformer-based power sources, electrode selection, joint prep, and the realities of AC stick welding. This isn’t about replacing your main machine—it’s about having a capable backup or learning tool that cost almost nothing.
Master your travel speed and arc length before blaming the machine. A steady hand and clean metal will get better results out of a basic MOT setup than sloppy technique on a $2000 inverter. Take your time, practice on scrap, and stay safe out there.


