Hey there, fellow welders! If you’re diving into the world of MIG welding, you’ve probably heard the debate: should you push or pull your MIG welder? I’ve spent countless hours in the shop, torch in hand, experimenting with both techniques. I’ve made my fair share of messy welds while figuring this out!
This question isn’t just a technicality—it can make or break the quality of your weld. Let’s break it down together in a way that’s easy to understand, whether you’re a beginner or a seasoned pro. By the end of this article, you’ll know exactly when to push, when to pull, and why it matters.
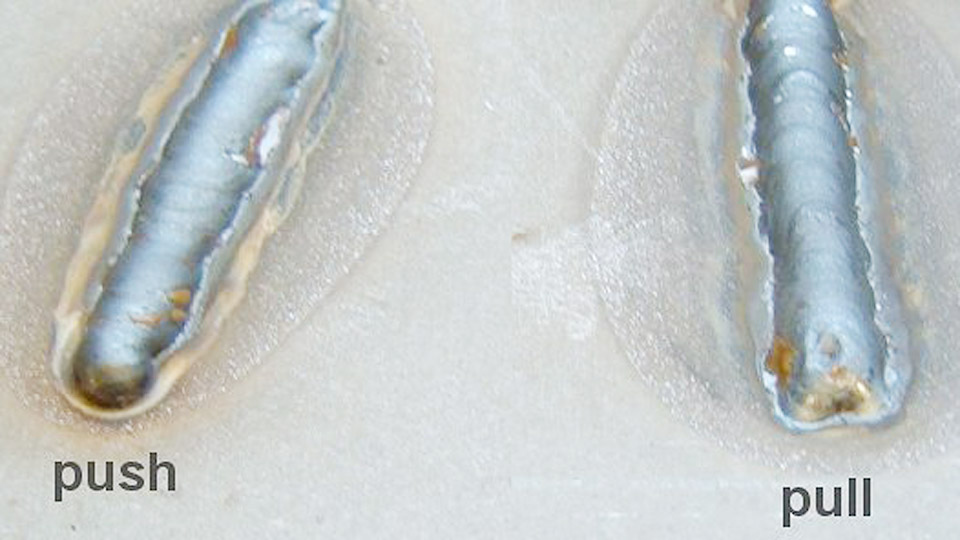
Image by mig-welding.co.uk
What Does Pushing and Pulling Mean in MIG Welding?
Before we dive into the pros and cons, let’s make sure we’re on the same page. When we talk about pushing or pulling in MIG welding, we’re referring to how you move the welding gun along the joint.
Pushing: You hold the MIG gun so the tip angles toward the direction you’re welding. The wire feeds out, and you’re pushing the weld pool forward. Picture it like pushing a broom across the floor.
Pulling: You angle the gun away from the direction you’re welding, dragging the weld pool behind you. It’s like pulling a paintbrush toward you as you stroke.
Both techniques have their place, but they produce different results depending on the material, position, and weld type. I’ve tried both in my projects, and each has its own vibe. Let’s explore why.
Why the Push vs Pull Debate Matters
You might be thinking, “Does it really matter how I hold the gun?” Oh, it does! The way you move your MIG welder affects the weld’s appearance, strength, and penetration. A wrong choice can lead to weak welds, excessive spatter, or even burn-through.
When I started welding, I didn’t pay much attention to this. I’d just grab the gun and go. But after a few ugly beads and some advice from a mentor, I learned that technique is everything.
Pushing and pulling influence how the shielding gas interacts with the weld pool, how much heat you’re applying, and even how much cleanup you’ll need later. Let’s break down the key factors so you can make the right choice for your project.
The Benefits of Pushing in MIG Welding
Pushing the MIG gun has some serious advantages. Here’s what I’ve noticed after using this technique on various projects:
Better Visibility
When you push, you can see the weld pool clearly because the gun isn’t blocking your view. This is a lifesaver when you’re working on intricate joints or thin materials. I remember welding a thin steel sheet for a custom toolbox—pushing made it so much easier to stay on track and avoid mistakes.
Smoother, Flatter Welds
Pushing creates a flatter, wider weld bead. The arc spreads the heat more evenly, giving you a smooth, polished look. If you’re working on something visible, like a car panel or furniture, pushing is often the way to go. It’s like getting that perfect, Instagram-worthy weld.
Less Penetration
Since the heat is distributed more broadly, pushing tends to produce less penetration. This is great for thin metals where you don’t want to burn through. I’ve used this on aluminum sheets, and it’s helped me avoid warping the material.
Cleaner Welds with Less Spatter
Pushing allows the shielding gas to cover the weld pool more effectively. This means less spatter and cleaner welds. I’ve noticed fewer tiny metal balls sticking to my workpiece when I push, which saves time on cleanup.
The Drawbacks of Pushing
Pushing isn’t perfect, though. Here are some challenges I’ve faced:
Tougher in Tight Spaces: If you’re welding in a corner or a confined area, angling the gun forward can be awkward. I’ve struggled with this when working on complex assemblies.
Not Ideal for Thick Materials: Because pushing gives shallower penetration, it’s not the best for thick metals that need deep fusion. I learned this the hard way when a weld on a heavy steel frame didn’t hold up under stress.
Learning Curve: For beginners, pushing can feel less intuitive. It took me a few tries to get the angle and speed just right.
Benefits of Pulling in MIG Welding
Let’s talk about pulling, or dragging, the MIG gun. This technique has its own strengths, and I’ve come to appreciate it in certain situations.
Deeper Penetration
Pulling focuses the arc’s heat into a narrower area, giving you deeper penetration. This is perfect for thicker materials or joints that need extra strength. I’ve used pulling on heavy steel beams, and the welds hold up beautifully under load.
Better for Dirty or Rusty Metal
If your workpiece isn’t perfectly clean, pulling can be a game-changer. The concentrated heat burns through rust, paint, or mill scale better than pushing. I’ve saved time on prep work by pulling on older, weathered steel.
Easier in Tight Spots
Since you’re dragging the gun toward you, pulling is often easier in cramped spaces. I’ve used this technique when welding inside a frame or in corners where pushing just wasn’t practical.
More Control for Beginners
For new welders, pulling can feel more natural. It’s like dragging a marker across paper—you can see where you’ve been, which builds confidence. When I taught my buddy to weld, he picked up pulling faster than pushing.
The Drawbacks of Pulling
Pulling isn’t always the answer, though. Here’s what I’ve run into:
Messier Welds: Pulling can create more spatter because the shielding gas doesn’t cover the weld pool as well. I’ve had to spend extra time grinding down spatter on some projects.
Narrower, Less Pretty Beads: The weld bead tends to be taller and narrower, which isn’t ideal for cosmetic welds. If you’re working on something that needs to look good, like a motorcycle frame, pulling might not give you that sleek finish.
Risk of Burn-Through on Thin Metal: The deeper penetration can be too much for thin materials. I’ve accidentally burned holes in thin steel when I wasn’t careful.
When to Push vs When to Pull
So, how do you decide? After years of welding, I’ve developed a mental checklist based on the project. Here’s a quick guide to help you choose:
| Factor | Push | Pull |
|---|---|---|
| Material Thickness | Best for thin metals (less than 1/8 inch) | Ideal for thick metals (1/8 inch or more) |
| Material Type | Great for aluminum, stainless steel | Better for steel, especially if dirty |
| Weld Appearance | Smoother, flatter, cosmetic welds | Narrower, less polished welds |
| Penetration Needs | Shallow penetration | Deep penetration |
| Workspace | Needs open space for gun angle | Works in tight spaces |
| Skill Level | Slightly harder for beginners | Easier for beginners |
My Go-To Scenarios
Pushing: I push when welding thin aluminum panels for car repairs or stainless steel for kitchen equipment. The smooth beads and low penetration are perfect for these jobs.
Pulling: I pull when working on thick steel frames or rusty farm equipment. The deep penetration ensures strong welds, even if the metal isn’t pristine.
Tips for Mastering Both Techniques
Whether you’re pushing or pulling, a few tricks can make your welds stand out. Here’s what I’ve learned:
Maintain a Consistent Angle: Keep your gun at a 10-15 degree angle for both techniques. Too steep, and you’ll mess up the shielding gas coverage.
Control Your Speed: Move too fast, and your weld will be weak. Too slow, and you’ll pile up too much filler. Practice on scrap metal to find the sweet spot.
Adjust Your Settings: Your welder’s voltage and wire speed need to match the technique and material. I always test my settings on a practice piece first.
Clean Your Metal (When Possible): Even though pulling can handle dirty metal, cleaning off rust or paint gives better results for either method.
Use the Right Gas: For MIG welding, a mix like 75% argon/25% CO2 works well for steel. For aluminum, stick to 100% argon. I’ve seen bad welds from using the wrong gas mix.
Common Mistakes to Avoid
I’ve made plenty of mistakes, so let me save you some trouble:
Switching Techniques Mid-Weld: Stick to one method for the entire weld. Switching between pushing and pulling creates inconsistent beads.
Ignoring Gun Angle: A wrong angle can lead to poor gas coverage, causing porosity or spatter. I’ve ruined a few welds by getting lazy with my angle.
Not Practicing Enough: Both techniques take practice. Don’t expect perfect welds right away. Grab some scrap metal and experiment.
Forgetting Safety: Always wear your helmet, gloves, and protective clothing. I’ve had a few close calls with sparks, and trust me, safety gear is non-negotiable.
My Personal Experience: Push vs. Pull
When I started MIG welding, I was all about pulling. It felt natural, and I liked the deeper penetration for the thick steel I was working on. But as I took on more projects, I realized pushing was better for certain jobs, like welding thin aluminum for a friend’s boat repair.
Now, I switch between the two depending on the project. For example, last month, I was building a custom trailer. I pulled for the heavy frame joints to ensure strength, but I pushed for the thin sheet metal sides to keep them smooth and clean.
The key is to know your material and your goal. If strength is priority number one, pulling might be your best bet. If you’re after a clean, pretty weld, pushing is often the winner. Experimenting with both has made me a better welder, and I’m confident it’ll do the same for you.
Conclusion: Push, Pull, or Both?
After years of welding, I can tell you there’s no one-size-fits-all answer to the push vs. pull debate. Both techniques have their strengths, and the best welders know when to use each. Pushing gives you smooth, clean welds perfect for thin metals or cosmetic work.
Pulling delivers deep penetration for thick or dirty materials. By understanding your project—material thickness, type, and workspace—you can make the right choice every time.
So, practice both methods, and don’t be afraid to make mistakes. That’s how I learned, and it’s how you’ll grow as a welder too. Whether you’re fixing a car, building furniture, or tackling a heavy-duty project, mastering push and pull will take your welds to the next level. Now, go fire up that welder and create something amazing!
FAQs
What’s the main difference between pushing and pulling in MIG welding?
Pushing means moving the weld gun forward, creating a flatter, smoother bead with less penetration. Pulling means dragging the gun toward you, giving deeper penetration but a narrower, less polished bead.
Can I use both push and pull in the same project?
Yes, but not in the same weld bead. Stick to one technique per weld to keep it consistent. You can push for some parts of a project and pull for others, depending on the material and joint.
Is pushing or pulling better for beginners?
Pulling is often easier for beginners because it feels more natural and gives you better control. But with practice, pushing becomes just as manageable.
What happens if I push on thick metal?
Pushing on thick metal can lead to shallow penetration, which might weaken the weld. For thick materials, pulling is usually better to ensure strong fusion.
Do I need different settings for pushing vs. pulling?
You might need slight adjustments to voltage and wire speed depending on the technique and material. Always test your settings on scrap metal first to get the best results.
Can I push or pull with any MIG welder?
Yes, any MIG welder can handle both techniques. The choice depends on your skill, the material, and the weld you’re aiming for, not the welder itself.