First time I tried cutting aluminum clean, I thought my machine was broken. The arc kept wandering, sparks sprayed everywhere, and the edge looked like it had been chewed instead of cut. That frustrating afternoon is when I realized how critical Plasma Cutter Settings for Aluminum really are—and how different aluminum behaves compared to steel.
I learned the hard way that wrong settings don’t just ruin cut quality; they waste consumables, increase safety risks, and cost real money. Too much amperage warps thin sheet, too little leaves dross welded to the edge, and poor air pressure can turn a simple cut into a messy grind job. Once I dialed things in through trial, error, and burned tips, the results finally clicked.
If you’re tired of rough edges, excessive sparks, or guessing every time you pull the trigger, you’re in the right place. Here’s the technique that actually works—let me walk you through it step by step.
What is Plasma Cutting and Why Use It for Aluminum?
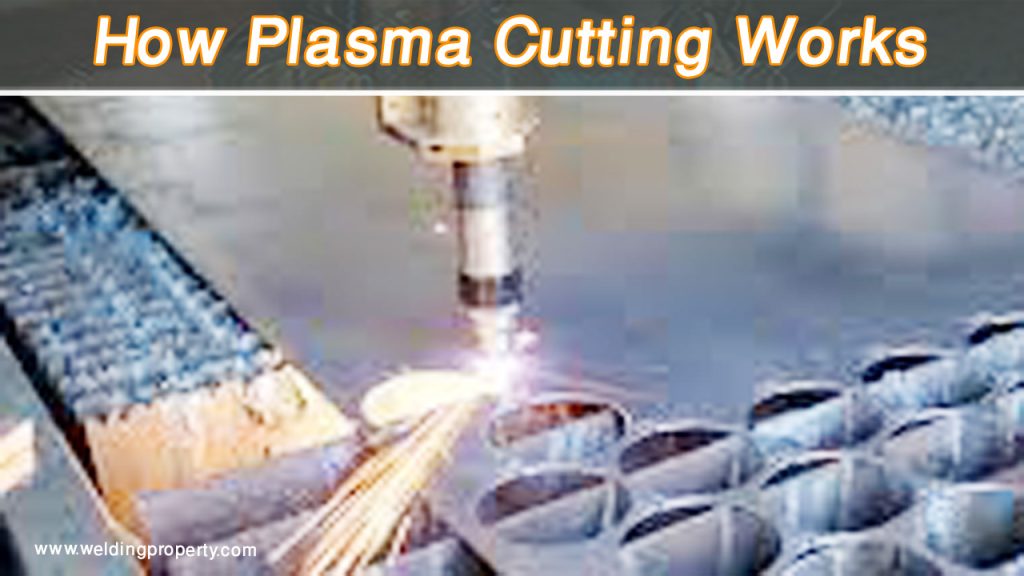
Plasma cutting has been a game-changer in my shop since I first picked up a torch back in the early 2000s. It’s essentially superheating gas to create a plasma arc that slices through metal like a hot knife through butter.
For aluminum, this process shines because it handles the material’s reflectivity and conductivity without the headaches of other methods like oxy-fuel, which can be messy and imprecise.
Think about it: aluminum is everywhere in US fabrication—from aircraft parts to boat hulls and even DIY home projects like building a custom trailer. Plasma cutting lets you achieve tight tolerances quickly, which is crucial for maintaining structural strength in load-bearing pieces. I’ve seen guys switch from saws or grinders to plasma and cut their project time in half, all while reducing waste.
But why bother with plasma over laser or waterjet? For most hobbyists and pros, it’s about affordability and versatility. A good plasma setup costs a fraction of a laser cutter and doesn’t require the massive water tanks of a waterjet.
Plus, in a busy shop, it handles mixed metals without constant retooling. Just remember, aluminum’s oxide layer can play tricks on the arc, so starting with the basics ensures you avoid frustration from the get-go.
Essential Equipment for Plasma Cutting Aluminum
Before we tweak any dials, let’s talk gear. Your plasma cutter is the star, but not all are created equal for aluminum. I’ve used everything from basic 30-amp units for light work to beefy 70-amp machines for heavier stock.
For aluminum, opt for one with adjustable amperage and gas options—something like an inverter-based model for portability or a transformer-style for raw power on thicker pieces.
You’ll need consumables tailored to aluminum: nozzles, electrodes, and shields that resist the material’s tendency to cause faster wear. In my experience, fine-cut consumables are gold for thin sheets, giving you narrower kerfs and less cleanup. Don’t skimp on a good air compressor either; it needs to deliver clean, dry air at consistent pressure to keep your arc stable.
Add in a sturdy work table—preferably with a downdraft for fume extraction—and clamps to secure your piece. I’ve learned the hard way that a wobbly setup leads to jagged cuts.
For CNC folks, integrate your plasma with software that allows precise speed control; it’s transformed how I handle repetitive jobs like cutting brackets.
Safety First: Protecting Yourself in the Workshop
Safety isn’t just a checkbox—it’s what keeps you welding another day. Aluminum plasma cutting kicks up fine dust and fumes that can irritate lungs or even combust if not handled right. Always suit up in flame-resistant coveralls, leather gloves, and a helmet with a shade 5-9 lens.
I once skipped proper ventilation on an indoor job and ended up with a headache that lasted hours; now, I never cut without a respirator or exhaust fan pulling those particles away.
Ground your workpiece properly to avoid arc flashbacks, and keep your shop clear of flammables—aluminum shavings can ignite if they build up. For water-shielded systems, watch for hydrogen gas accumulation; it’s rare, but I’ve heard stories of explosions from trapped bubbles.
Inspect hoses and connections daily, and if you’re piercing thick stock, stand clear of the splash zone. Trust me, treating safety like second nature has saved me from more than a few close calls.
Preparing Your Aluminum Material
Prep work is where half the battle is won. Aluminum comes with a natural oxide layer that can disrupt your arc, so start by cleaning it off. I use a stainless steel wire brush or a dedicated aluminum cleaner—nothing abrasive like steel wool, which contaminates the surface. For coated or painted stock, strip it down to bare metal; otherwise, you’ll get erratic cuts and extra dross.
Measure and mark your lines with a soapstone or scribe—avoid markers that burn and foul the cut. Clamp the piece flat to prevent warping from heat, especially on thin sheets. If it’s thick plate, preheat slightly with a torch to even out expansion.
I’ve ruined a few expensive sheets by skipping this, ending up with bowed edges that needed hammering straight. Take your time here; good prep means smoother settings adjustments later.
Key Plasma Cutter Settings Explained
Diving into the settings, it’s all about balance. Too much power melts the edges; too little leaves incomplete cuts. I’ve tinkered endlessly to find what works, and it boils down to amperage, gas, pressure, speed, and torch position. Let’s unpack each.
Amperage Settings
Amperage is your power dial—higher means more heat for thicker material. For aluminum, start lower than you’d think for steel because of its lower melting point. On thin stuff under 1/4 inch, I run 20-40 amps to avoid blowouts.
Bump to 45-60 amps for 1/4 to 1/2 inch, and 60+ for heavier gauges. Always check your machine’s manual, but in practice, I test on scrap: if the kerf is too wide or dross-heavy, dial it back.
One lesson from a botched boat repair job: over-amping thin aluminum caused warping that threw off the entire assembly. Now, I match amps to thickness precisely, ensuring the arc penetrates without excess heat.
Gas Type and Pressure
Gas choice can make or break your cut quality. Basic air plasma works for aluminum, but it oxidizes the edge, leaving a rough, black finish. For cleaner results, switch to nitrogen as both plasma and shield gas on thin material—it’s what I use for precision work. On thicker stock, an argon-hydrogen mix adds energy for smoother edges, though it’s pricier.
Pressure-wise, aim for 60-80 psi with clean, dry air or gas. Too low, and the arc wobbles; too high, it blows out the cut. I keep a moisture trap on my line—damp gas once ruined a whole day’s work with porous edges. For multi-gas setups, nitrogen at 70 psi with a water shield has given me mirror-like finishes on 1/2-inch plates.
Cutting Speed and Torch Height
Speed is the unsung hero. Cut too slow, and heat builds up, causing dross and distortion; too fast, and you get jagged lines. For 1/8-inch aluminum, I push 80-100 inches per minute (IPM); slow to 40-60 IPM for 1/2 inch. Watch the sparks: they should trail at 15-30 degrees behind the torch for optimal speed.
Torch height matters too—keep it at 1/8 to 1/4 inch standoff. Drag shields let you contact the surface for steadier manual cuts. I angle the torch slightly for bevels, but perpendicular is best for straight edges. From experience, inconsistent height on a wavy sheet led to uneven kerfs; now, I use guides for control.
Recommended Settings for Different Aluminum Thicknesses
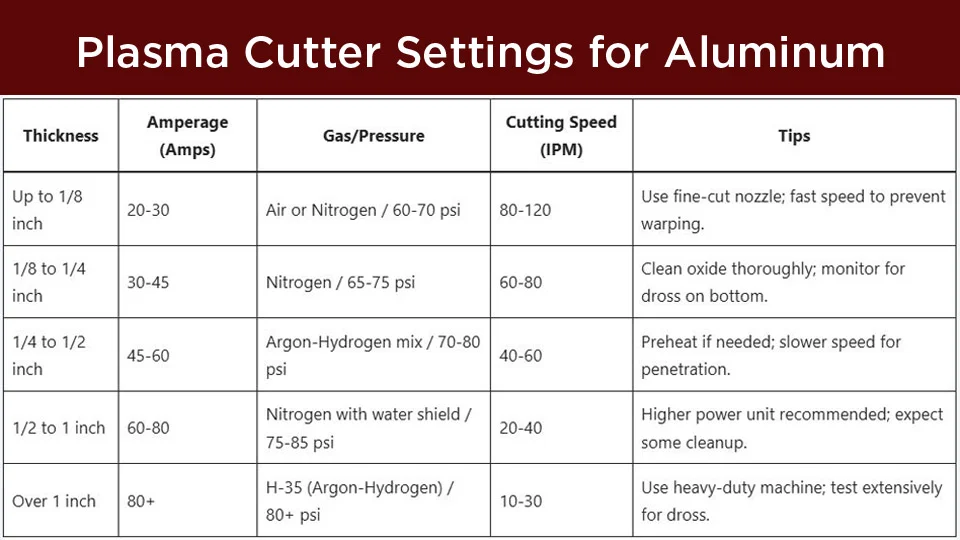
Aluminum thickness dictates everything. Here’s a table I’ve compiled from years of trial and error, based on common US machines like those from major brands. These are starting points—always test.
| Thickness | Amperage (Amps) | Gas/Pressure | Cutting Speed (IPM) | Tips |
|---|---|---|---|---|
| Up to 1/8 inch | 20-30 | Air or Nitrogen / 60-70 psi | 80-120 | Use fine-cut nozzle; fast speed to prevent warping. |
| 1/8 to 1/4 inch | 30-45 | Nitrogen / 65-75 psi | 60-80 | Clean oxide thoroughly; monitor for dross on bottom. |
| 1/4 to 1/2 inch | 45-60 | Argon-Hydrogen mix / 70-80 psi | 40-60 | Preheat if needed; slower speed for penetration. |
| 1/2 to 1 inch | 60-80 | Nitrogen with water shield / 75-85 psi | 20-40 | Higher power unit recommended; expect some cleanup. |
| Over 1 inch | 80+ | H-35 (Argon-Hydrogen) / 80+ psi | 10-30 | Use heavy-duty machine; test extensively for dross. |
For example, on a 1/4-inch sign project, I started at 40 amps and 70 IPM with nitrogen, tweaking up 5 IPM when dross appeared. It saved material and time.
Step-by-Step Guide to Cutting Aluminum
Ready to cut? Here’s how I do it every time.
First, set up your workspace: Secure the aluminum, ground it well, and don PPE.
Second, select consumables and gas based on thickness—nitrogen for clean edges.
Third, dial in amps, pressure, and speed from your chart.
Fourth, test on scrap: Pierce from the edge if possible, move steadily, and inspect the cut.
Fifth, make the real cut: Start slow, accelerate to speed, and keep the torch steady.
Sixth, cool and clean: Let it sit, then brush off dross.
I followed this on a custom gate job, turning potential scrap into a pro finish.
Common Mistakes and How to Avoid Them
Even seasoned welders slip up. One biggie: using air gas on thick aluminum, leading to heavy oxidation. Switch to nitrogen—problem solved.
Another: cutting too slowly, melting the edges. I did this early on with a bracket set; now, I time my passes and speed up.
Dirty material is a killer—oxide causes arc instability. Always clean first.
Worn consumables? They oval out and ruin focus. Replace at first pitting; it’s cheaper than rework.
Forgetting to adjust for alloy—5052 cuts differently than 6061 due to composition. Test small.
Troubleshooting Poor Cuts
Rough edges? Check gas quality—moist air is often the culprit. Dry it out.
Excess dross? Speed up or lower amps; on bottom edges, it’s normal but minimize with angle.
Warping? Use clamps and intermittent cuts to dissipate heat.
Arc not starting? Clean ground connection and remove oxide.
Bevel too much? Steady your hand or use a guide; CNC eliminates this.
I troubleshot a wavy cut on a trailer frame by swapping nozzles—fixed instantly.
Advanced Tips for Professional Results
Once basics are down, level up. For intricate shapes, CNC plasma with software like mine automates settings for repeatability.
Mix gases for thick cuts: Argon-hydrogen pierces better.
Post-cut, pickle the edges with acid for weld prep—removes oxide without grinding.
Store aluminum flat to avoid bends; humidity warps it.
In humid US summers, dehumidify your shop to keep gas dry.
From a pro job on aircraft parts, preheating thick stock ensured zero distortion.
Experiment with torch angles for chamfers—saves machining time.
Conclusion
Mastering plasma cutter settings for aluminum boils down to understanding your material, tweaking for thickness, and practicing relentlessly. You’ve got the tools now to tackle projects with confidence, whether it’s a hobbyist fix or pro fab work—cleaner cuts mean stronger welds, less waste, and safer operations.
Always keep a log of your successful settings; it’ll turn trial-and-error into a reliable system over time. Get out there and cut—your workshop awaits.
FAQ
What gas is best for plasma cutting aluminum?
For most cuts, nitrogen gives cleaner edges than air, reducing oxidation. On thicker pieces, try an argon-hydrogen mix for better penetration—I’ve switched mid-project and seen night-and-day differences in finish.
How do I prevent dross when cutting aluminum?
Adjust speed and amps: Go faster on thin stock to avoid melt buildup. Clean your material first, and use the right gas—nitrogen helps a ton. If dross sticks, a quick brush or grinder post-cut handles it without hassle.
Can a standard air plasma cutter handle aluminum?
Absolutely, but expect rougher edges with oxidation. It’s fine for basic jobs, but for pro results, upgrade to a multi-gas system. I started with air-only and it worked, but nitrogen elevated my game.
What amperage should I use for 1/4-inch aluminum?
Start at 40-50 amps with 60-80 IPM speed. Test on scrap—if it’s melting too much, drop to 35 amps. Matches most US machines I’ve used.
How does aluminum thickness affect cutting speed?
Thinner means faster: 100+ IPM for 1/8 inch to prevent warping. Thicker slows to 30-50 IPM for full cut-through. Always balance with amps for minimal heat input.